Camera Obscura
A camera obscura is a Darkned box with a convex lens or aperture for projecting the image of an external object on to a screen inside a forerunner of the modern camera. It was created by Alhazen or Ibn Al-Haytham.
It was created as far as 400BC possibly even before records existed the earliest known about the camera obscura was provided by a Chinese Philosopher called Mo-tzu.
It was created as far as 400BC possibly even before records existed the earliest known about the camera obscura was provided by a Chinese Philosopher called Mo-tzu.

|
1. The word photography literally means 'Drawing with Light' which derives from the greek word Photo meaning light and graph, meaning to draw photography is the process of recording an image.
2. It's called a Camera Obscura and it's about 200 years old the words mean camera = room and obscura = Dark. 3. the camera obscura was originally discovered by Alhazen or Ibn al Haytham is said to have actually created it. 4. artists in the renaissance used the camera obscuras to help themselves to render the correct perspective of views seen from eye level. 5. when people began to add lens to the camera obscura they discovered that it allow larger aperture giving usable brightness while maintaining focus. |
|
|
|
Abelardo Morrell
Abelardo Morell is a contemporary artist widely known for turning rooms into Camera Obscuras and then capturing the marriage of interior and exterior in large format photograph.


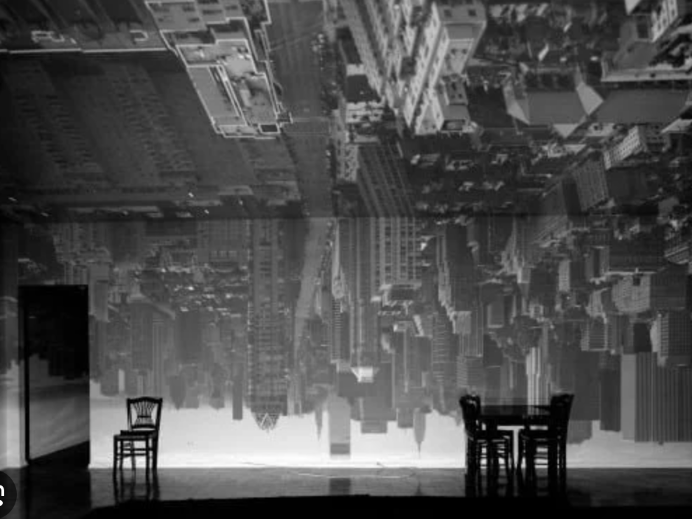
I like this image from Abelardo Morrell because it is quite unique. This is a photograph of a city but its projected upside down it shows that the projector is projecting the image on big wall of a room. Obviously Abelardo Morrell took this photograph, it was taken to show what a camera obscure can do it has a surprising effect on people today, this informs my knowledge and most importantly it is a reliable historical evidence.
THE PINHOLE CAMERA.
First of all to make my pinhole Camera i needed a box Wich i painted black from the inside and then cut square trough the side of it and then I attached piece of metal to is and cut a really tiny hole trough it and created a shutter over it.
PINHOLE PHOTOGRAPHY EVALUATION.
I did quiet a few experiments with my pinhole camera and I got some good results and some not good at all overall it were nice experiments. I can get better at taking pictures with pinhole by taking them with a different time limit and and try different cameras.
HERE IS MY STEP TO STEP IN MAKING A PINHOLE CAMERA:
- First you should get a box not a big one or a small one like e.g. Pringles Can or an Iphone box.
- After you need to paint it all black from the inside.
- Then you should cut a square in the box and replace it with piece metal.
- In the metal you should cut a hole trough it with a needle it should be a really small hole.
- No light should be able to enter the box so you should tape all the open edges of the box.
VJEKO SAGER

|
this is a abstract paper photograph, it shows a paper in which vjeko sager cut holes and used light to create shadows i think these pictures where taken in the 1970s-1980s somewhere between that era photographic portraits while seeming 'real' they are not really truthful because photography is the best evidence of visual thinking i think his pictures did reach the original purpose of why they were taken because they are popular and are being studied by students now.
This pictures and photo taking style informs my knowledge and i think it's a reliable and relevant as an historic evidence about photography. |


I took some photos inspired by Vjeko Sager my first impression is that they look similar but they are different if you look closely i tried to interpretate one of Vjeko Sager most famous pictures i like the style of them because they are a bit unique and are not really popular in today's world but it certainly is a really reliable source of history as this was popular 40-50 years ago. Vjeko Sager is a kind of artists whose series antimatter combines cut paper abstractions.
FRANCIS BRUGUIÈRE


the image that stood out to me is this one because it looks like there are some shapes all crushed together. Francis Bruguiere used to take these pictures with cut paper twisted into relief and a single lamp positioned in different positioned. Bruguiere created unnatural worlds in his pictures. all of his pictures were taken between 1890-1945. Most of his pictures are exposure montage prints of person and places.
Paper cut Abstraction


I changed the brightness of the image on Photoshop and made it brighter after i changed the contrast making it go to 100, that made photograph different than before.


This is a paper-cut abstract picture, this shows a piece of paper with lots of cuts and destroyed.
I took these pictures the one in black and white on the floor with different shadows and from difference distance and then i scanned them in the printer with two different colours, i choose orange and blue because i like the colours, i colour-copied them in the printer by scanning them and after it got sent to my E-mail by the printer itself.
The photograph achieved its original purpose of showing the two image contrast.
This could be a truthful depiction of the subject.


these pictures were really fun to take because i enjoyed finding the light source for them and the pictures look pretty cool as well because of the difference between each one of them is really eye-catching because of the way they look or the clear difference in light that you can see on the walls make them unique


First of all i printed two pictures with contrasting colours and then glued it on a black sheet. This is a eye level photograph , this shows a design that i made by cutting one of the sheets printed and sticking it on a foam bit and sticking on the other sheet that i did not cut. then i took this picture , i made it black and white and then i inverted it and printed it on a A4 sheet.
|
|
The video was really interesting and sometimes funny aswell, it explained the topic really well.
The video explained the different ways to do light painting in a very detailed way and it showed how to set up the cameras that are going to take the picture properly. The video gave different ideas on what to do with light painting and how to make it look cool. |
Light Experiment


the experiment was really fun and creative and new to me , the way you set the camera and all the images may look hard really to recreate but are really easy in-fact you just need the flashlight of your phone to do the first 4 for and the last 2 you need a light box that you can change the light of and create shapes that you want like the last one that looks like an aura, overall it was really fun.
PHOTOGRAMS
Photograms are images taken without a camera, the object is placed directly on surface that is a light-sensitive material and then exposing to the light. photograms are generally unique and reproduce an actual size image of the object that blocks light from a light sensitive surface.
To take a photogram you just need a sun-sensitive paper then you put the objects or whatever you need a photogram of and let it sit in the sun for bit and after that you have made a photogram. Photogram look like shadows.
To take a photogram you just need a sun-sensitive paper then you put the objects or whatever you need a photogram of and let it sit in the sun for bit and after that you have made a photogram. Photogram look like shadows.


HOW TO CREATE A PHOTOGRAM , STEP TO STEP:
1. Find your subject , a good subject or set of subjects is a key to an interesting photogram.
2. Compose your photogram , it is best to practice different compositions before you even reach for the photographic paper.
3. Exposing the paper before you begin this step , make sure you have everything you need.
4. Make sure your photographic paper is to hand.
5. have your red photographic safe light (if you are using one) and have your desk lamp.
6. once your happy ,turn off the lights and remove the photographic lights and remove the photographic paper from the box , taking care that the light sensitive surface is upwards.
7. Once you are happy expose the paper to the desk lamp expose the paper to 2-3 seconds depending on the brightness.
8. Now you are ready to develop your photogram! be aware the paper is still sensitive.
LIGHT AS A SUBJECT
ROBERT ADAMS
Robert Adams was born in the City Of Orange in New Jersey USA in 1937 , started doing photography in 1964 but he actually started photographing 3 years later and taught it to others as-well. In 1969 his famous 4 prints were bought by a museum of arts and a year later he started focusing and putting his time in photography. He is famous for his images of the American West. He photographed the landscape of the American West But he was mostly famous for saying ' JUST DON'T TAKE PHOTOS , MAKE PHOTOS '. Robert Adams used the Rolleiflex TLR.


|
It's a black&white image that shows a town in the USA taken in 1969 in pikes peak park in Colorado springs.
My gut feeling was that these are old pictures of probably war times because everything looks abandoned and grey , not because its black and white but my gut feeling is making me feel like this. This picture looks like it was taken to show the landscape , i think this is a truthful depiction of the subject that Robert Adams was trying to show us. |

|


I took these pictures inspired by Robert Adams and how he takes pictures showing something in the distance and i took these pictures inspired by him. I took these pictures in the school because it's really big and got lots of spaces to take pictures of.
PICTURES TAKEN INSPIRED BY ROBERT ADAMS.


I took these pictures inspired by Robert Adams as most of his pictures involve streets and houses , he takes them in Black and White but i didn't have that feature but the pictures still look pretty cool and mostly somehow a bit similar to Robert Adams pictures , i took these pictures after school on my way home and they turned pretty good. I was trying to achieve a result similar to Robert Adams , i used my phone to take these pictures , i could develop my ideas by putting more effort and getting creative and imaginative.


i picked these pictures because they are similar to what Robert Adams did and they look nice and i like the way i took these pictures and that they represent light and landscape.
